Gravity Drop
Purpose
The purpose of the laboratory today is to observe the motion of a ball in free fall. We want to decide if it is in uniform acceleration, and if so, determine the value of the acceleration. We expect that it is uniformly accelerated, of course, with the acceleration of gravity, 9.8 m/s2. We will use two separate methods. The first consists of a pair of photocells and lights (or “photogates”) which trigger when an object passes through. These can measure the velocity of the ball at two points, as well as the time taken to travel between the photogates. The second method will use a computer to analyze a video clip of the motion of the ball.
Theory
The mathematical relationship which expresses the position of an object as a function of time is called the equation of motion. The general form of this equation describes motion in three spatial dimensions (x, y, and z) as a function of time; proper incorporation of the initial values (i.e. at time t = 0) of position and velocity completely describes the motion of an object. Three-dimensional motion is rather complicated to describe since three components of position and velocity must be considered.
The simplest form of motion we can study is that of an object moving in a straight line (one-dimensional motion) under a constant acceleration. Freefall of a mass over a short distance near the earth's surface (where the gravitational acceleration is almost a constant) is an example of such motion and the focus of this experiment. There are three main equations which govern the basic motion of a freely falling object. These relate the position, velocity, and acceleration of the object at any given moment to the force of gravity. These equations are:
Position: ![]()
Velocity: ![]()
Acceleration: ![]()
We take the positive direction as downwards for our experiment. The value g is the gravitational acceleration which all freely-falling objects experience (in the downward direction) near the earth's surface; the value of g is 9.8 m/s2. For more complex motion, it is more typical to consider upwards to be the positive direction, so that the acceleration due to gravity is negative.
The acceleration is the rate of change of the velocity. This means that if the acceleration is 5 m/s2, (5 meters per second, per second), then every second the velocity changes by 5 meters per second. Dividing the change in velocity by the time between measurements will give the average acceleration over that period of time. If the acceleration is constant, then this should give you the same value for the acceleration regardless of how much time elapses between the two velocity measurements. The change in the velocity will be different, but the ratio of this change to the amount of elapsed time will be the same.
The timer can report three different values. If just button “A” is pressed, this gives the time taken for the ball to pass through photogate “A”. Similarly, if just button “B” is pressed, it gives the time taken to pass through gate “B”. If both are pressed, the timer gives the time elapsed as the ball travels between the two gates.
For our purposes, the amount of time taken to pass through a single gate is short enough that we can consider the velocity to be constant. The velocity at this point can just be taken as the diameter of the ball divided by the time taken to pass through. This means that it is very important that the diameter of the ball is measured carefully, and that the path takes it through the exact center of the gate. If only the edge of the ball passes through, the photogate will be blocked for a shorter period of time, so the measured velocity will be too high. By measuring the time at each gate separately, we can determine the velocity of the ball at each gate.
For the video analysis, we’ll specify the position of the ball in each frame. Then, we’ll measure an object in the field of view (the post used for dropping the ball would work well) to provide a conversion from pixels to an actual length. Using the known number of frames per second, we can then determine the position, velocity, and acceleration of the ball at any point in its movement. The VideoPoint software considers the positive y direction to be upwards, so the velocity and acceleration will be negative, since they are both directed downward.
Experimental
Procedure, Photogates
1. First, measure the diameters of both the metal and plastic marbles with calipers, and weigh them. Make your measurements in meters and kilograms.
Steel Ball Plastic
Ball
Mass: Mass:
Diameter: Diameter:
2. Set up the post in a convenient place near the lab table. Using a level, adjust the feet of the post until it is not tilted.
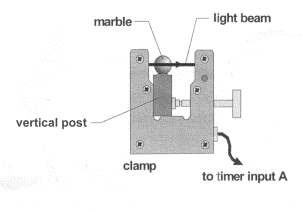
3. Select a position for the start photogate, and clamp it to the post, so that the path of the ball will pass through the photogate.
4. Select a position for the stop photogate, and clamp it to the post as well.
5. Use the plumb line to check whether the ball will fall through the center of the photogates, and adjust them if necessary.
6. Connect the timer box to the start and stop photogates with the cable.
7. Place the ball in the clamp at the top of the post.
8. Release the ball by opening the clamp. It should land in the receptacle at the bottom, but be prepared to catch it if it bounces or rolls out!
9. Practice releasing the ball a few times and notice that the times displayed are rather consistent.
10. Record the values for Dta, Dtb, and Dtab. at least three times with the photogates in the present configuration, filling in this table with the times. Note that it is not necessary to drop the ball three times to get this measurement. Dropping the ball once gives all three, and you can then read each one, depending on whether button “A” is pushed, button “B” is pushed, or both are pushed. You can choose to either enter the data in the tables below, or you can use an Excel spreadsheet to record your data and make calculations. The file “GravityDrop.xls” has been set up with these same tables for data entry.
|
|
|
Position |
||||
|
|
|
1 |
2 |
3 |
4 |
5 |
|
Dta |
trial 1 |
|
|
|
|
|
|
trial 2 |
|
|
|
|
|
|
|
trial 3 |
|
|
|
|
|
|
|
average |
|
|
|
|
|
|
|
Dtb |
trial 1 |
|
|
|
|
|
|
trial 2 |
|
|
|
|
|
|
|
trial 3 |
|
|
|
|
|
|
|
average |
|
|
|
|
|
|
|
Dtab |
trial 1 |
|
|
|
|
|
|
trial 2 |
|
|
|
|
|
|
|
trial 3 |
|
|
|
|
|
|
|
average |
|
|
|
|
|
|
11. Using the average value for each position, compute the velocity at each of the two photogates by dividing the diameter of the ball by the time taken to travel through each gate separately. Divide the change in velocity by the time to travel between the two gates to find the acceleration.
|
Position |
Dta |
va = d/Dta |
Dtb |
vb = d/Dtb |
Dv = vb
- va |
Dtab |
a = Dv/Dtab |
|
1 |
|
|
|
|
|
|
|
|
2 |
|
|
|
|
|
|
|
|
3 |
|
|
|
|
|
|
|
|
4 |
|
|
|
|
|
|
|
|
5 |
|
|
|
|
|
|
|
12. Repeat steps 10 and 11 using the plastic ball instead.
|
|
|
Position |
||||
|
|
|
1 |
2 |
3 |
4 |
5 |
|
Dta |
trial 1 |
|
|
|
|
|
|
trial 2 |
|
|
|
|
|
|
|
trial 3 |
|
|
|
|
|
|
|
average |
|
|
|
|
|
|
|
Dtb |
trial 1 |
|
|
|
|
|
|
trial 2 |
|
|
|
|
|
|
|
trial 3 |
|
|
|
|
|
|
|
average |
|
|
|
|
|
|
|
Dtab |
trial 1 |
|
|
|
|
|
|
trial 2 |
|
|
|
|
|
|
|
trial 3 |
|
|
|
|
|
|
|
average |
|
|
|
|
|
|
|
Position |
Dta |
va = d/Dta |
Dtb |
vb = d/Dtb |
Dv = vb
- va |
Dtab |
a = Dv/Dtab |
|
1 |
|
|
|
|
|
|
|
|
2 |
|
|
|
|
|
|
|
|
3 |
|
|
|
|
|
|
|
|
4 |
|
|
|
|
|
|
|
|
5 |
|
|
|
|
|
|
|
Experimental Procedure, VideoPoint
1. Open the VideoPoint software.
2. Click to dismiss the opening splash screen, then choose “Open Movie”.
3. Select “Gravity Drop Steel Ball.mov”.
4. Specify that you will be locating a single object.
5. The first frame of the movie will appear, and the mouse pointer will be a target. Click on the steel ball to mark its position in this frame. The movie will advance to the next frame; continue marking the ball’s position in each frame. You can use the frame advance and back buttons to move one frame at a time to help spot the ball in frames where it is difficult to see.
6. Do not set the position in the frames after the ball bounces at the bottom (and you may also want to ignore the first point before the ball actually starts moving). It will be harder to use the automatic graph fitting capabilities of VideoPoint if you have the extra data points.
7. To provide a scale factor, measure the post (the clamp to hold the ball is in the top hole and the receptacle to catch it is in the bottom hole).
8. Click on the ruler icon in VideoPoint (or choose Scale from the Create menu). Enter the length you measured.
9. As directed by the program, click on one end of your measured distance, then click on the other end. This will automatically change the scale of the movie.
10. Choosing New Graph from the View menu will allow you to look at various views of the data. First, leave the horizontal axis as time, and set the vertical axis to display the y-component and choose “Position”. This will show a chart of the object’s motion as time passes.
11. Try viewing a graph of the y-component of velocity and acceleration.
12. You can use the Model or Fit capabilities of VideoPoint to determine the acceleration from the position graph, the velocity graph, or the acceleration graph. Model (clicking the “M” next to the graph or choosing Add/Edit Model from the Graph menu) allows you to enter parameters for a line yourself to try to manually match the data, while Fit (clicking the “F” or choosing Add/Edit Fit) will automatically fit a line to the existing data. Use Fit for the following exercises.
13. Fit a curve (use polynomial of degree 2 as the type) to the position graph. The curve will have an equation of the form At2 + Bt + C, where A, B, and C are constant values. Since position depends on t2, we want the value of the first constant, A. Looking at the above equations of motion, we see that g should be equal to twice this value.
14. Fit a line (use linear as the type) to the velocity graph. The line will have an equation of the form At + B, where A and B are constants. Again, looking at the equations governing the motion, the velocty depends directly on t, so the slope of the line (the value of A) will give you the acceleration.
15. Fit a line to the acceleration graph. The intercept of this line (the value of B) will give you the acceleration (the slope should be zero if acceleration is in fact constant). The line may not be quite flat due to experimental error, so instead of taking the intercept, you may want to determine the value of the fitted line for some value of t near the middle of the fall.
Steel Ball Acceleration
From Position Graph:
From Velocity Graph:
From Acceleration Graph:
16. Save your video analysis.
17. Repeat this procedure using “Gravity Drop Plastic Ball.mov”.
Plastic Ball Acceleration
From Position Graph:
From Velocity Graph:
From Acceleration Graph:
18. VideoPoint can show other values as well, such as the kinetic or potential energy. We’ll use these in later labs, but feel free to experiment with them now. For these values to be correct, you’ll need to include the mass of the ball. Choose Edit Selected Series from the Edit menu to enter the mass.
Questions
Is the acceleration in fact constant?
Is it the same for the metal ball and the
plastic ball?
If your value does not exactly coincide with
the expected value, what effects might have caused this?
If the values calculated by the two different
methods are not the same, what differences are there in the measurement
techniques that might cause this?
How accurately do you think that you measured
the force of gravity?